EasyAutoRig Detailed User Guide
If you only want to complete your first rig quickly, you can start with the Quick Start Guide . This guide provides a more detailed introduction to the EasyAutoRig interface, the purpose of each tab, and the complete workflow from selecting a model to generating the final assets.
1. What Is EasyAutoRig?
EasyAutoRig is a humanoid auto-rigging plugin for Unreal Engine.
It can quickly convert a compatible humanoid Static Mesh into a rigged character that can continue to be used in Unreal Engine, and generate the following assets according to the current settings:
- Skeleton
- Skeletal Mesh
- Automatic skin weights
- Optional Physics Asset
- UE5-style Twist bones
- UE5-style IK bones and helper bones
You do not need to manually build a complete skeleton in a DCC application such as Blender or Maya before importing the character into Unreal Engine.
The basic EasyAutoRig workflow is:
Select a Static Mesh → Place Landmarks → Adjust bone positions → Validate Rig → Rig → Inspect the generated result
Landmarks are the most important input in the entire workflow. Their positions participate directly in the final Skeleton fitting, so the more reasonably the Landmarks are placed, the better the foundation for skeleton generation, automatic skinning, and Physics Asset generation.
2. Only A Pose / T Pose Humanoid Models Are Supported, with Specific Orientation Requirements
EasyAutoRig currently supports only standard humanoid models in T Pose or A Pose.
The recommended model requirements are:
- Biped humanoid
- Approximately symmetrical left and right sides
- T Pose or A Pose
- The character faces world
+Y - World
+Zis Up Xis the left/right axis- The main body is located near the model’s local origin
In other words:
1 | |
Sitting poses, running poses, combat poses, crossed arms, raised-leg poses, and other arbitrary action poses are not part of the currently supported input.
This is because EasyAutoRig uses the relatively stable spatial relationships of the human body in T Pose / A Pose to identify the left and right sides, arms, legs, knees, torso, and other regions.
The model may include clothing, shoes, hair, skirts, capes, tails, accessories, and multiple separate Mesh Components. A nude base mesh is not required.
3. Create an EasyAutoRig Asset
In the Content Browser, right-click and select Animation → EasyAutoRig to create an EasyAutoRig Asset.
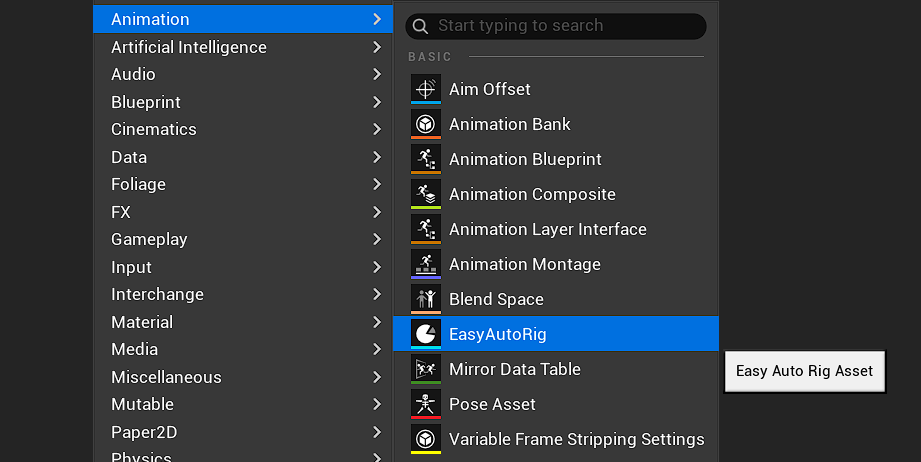
After creating it, you can rename the asset according to your own project naming convention, for example: EAR_CharacterName, AR_CharacterName
Double-click the asset to open the dedicated EasyAutoRig editor.
The asset stores the currently selected model, Landmarks, preview state, output directory, and other related settings. In general, it is recommended to create one EasyAutoRig Asset for each character, so you can reopen it later if you need to make further adjustments.
4. Details Panel
After opening the EasyAutoRig Asset, you will first see the Details panel on the right. In most cases, there are not many settings that actually need to be changed.
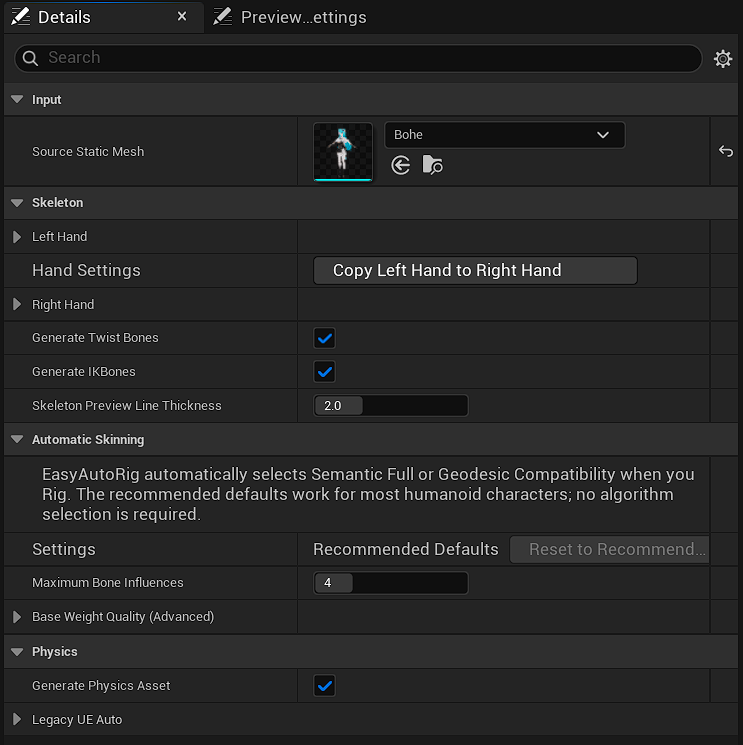
4.1 Select the Source Static Mesh
The most important setting is: Source Static Mesh
Select the humanoid Static Mesh you want to rig here. Once selected, the model will immediately appear in the viewport.
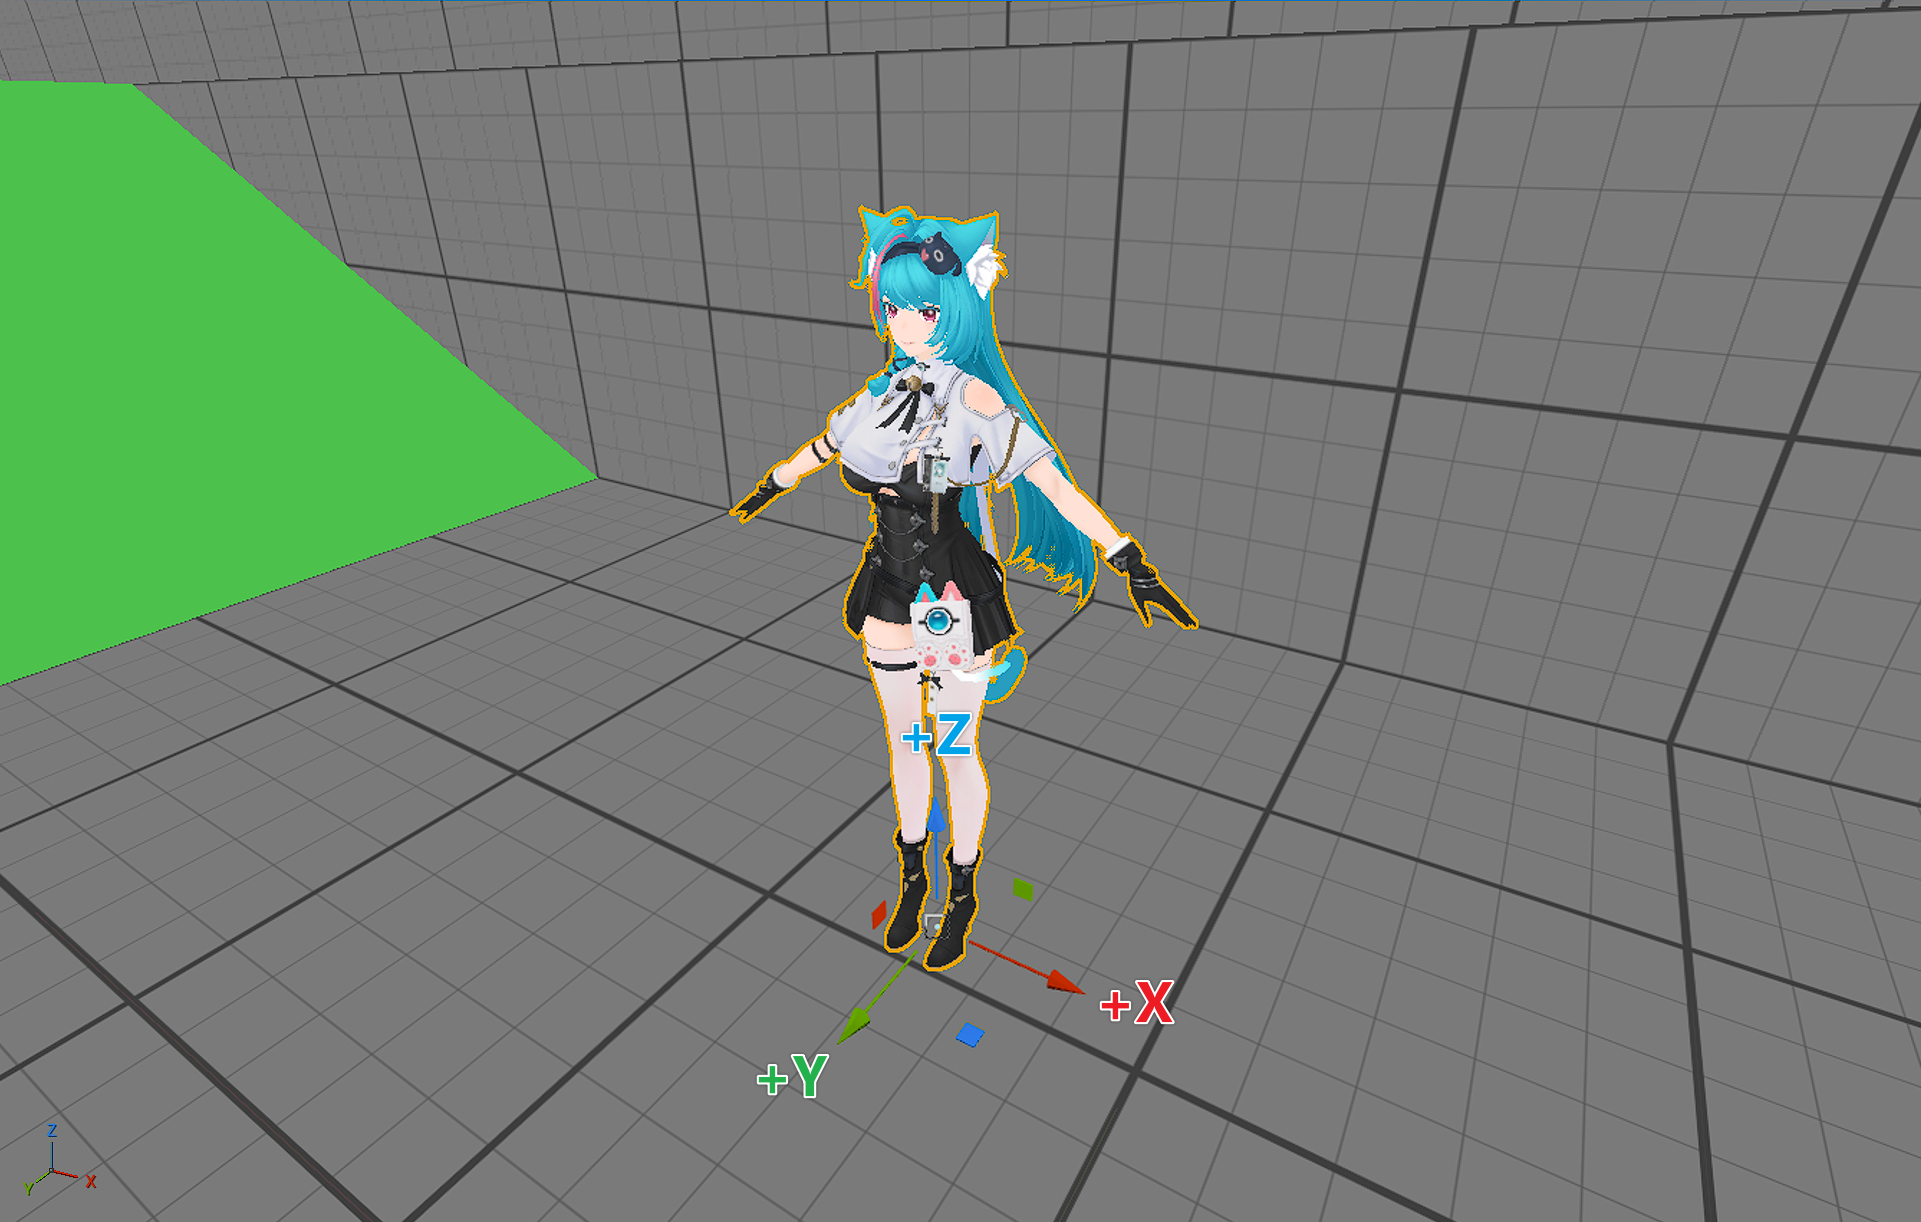
At this point, it is recommended to first confirm:
- Whether the model is in T Pose or A Pose
- Whether it faces +Y
- Whether the left and right sides are approximately symmetrical
- Whether the body is positioned reasonably
If these basic conditions are correct, you can continue with Landmark placement.
4.2 Other Settings Can Usually Stay at Their Defaults
EasyAutoRig already provides a set of default settings for standard UE5 humanoid characters, so in most cases the other parameters can be left unchanged.
If the model has a standard five-finger hand, the Hand / Finger settings normally do not need to be changed.
If the character does not have five fingers, or the hand structure differs from a standard humanoid hand, adjust the finger settings according to the actual model.
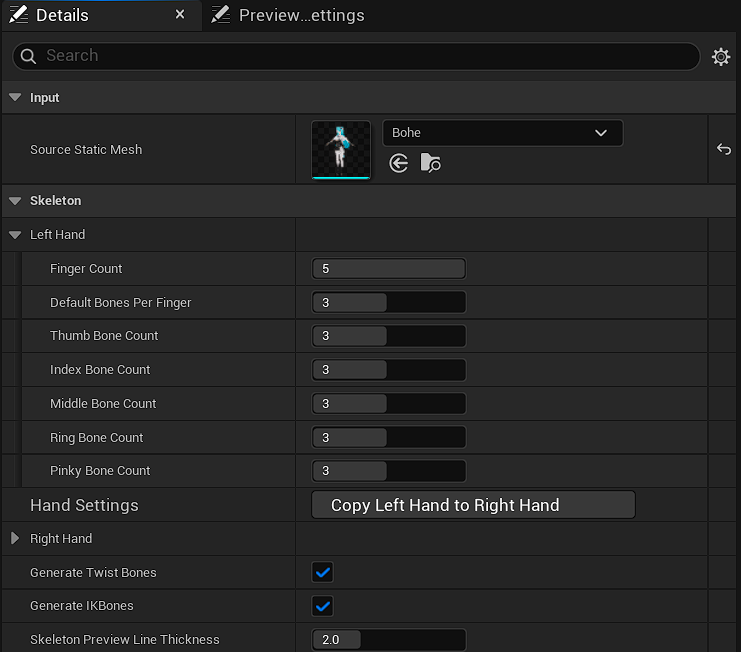
Other settings such as Auto Skinning, Physics, and Output are also recommended to remain at their defaults initially. Only adjust them when you clearly need to change the output behavior, skinning behavior, Physics Asset behavior, or other parameters.
Therefore, when using EasyAutoRig for the first time, you usually only need to:
Select the Source Static Mesh, then continue to the Landmark tab.
5. Landmark Tab
The Landmark tab is the main editing area in EasyAutoRig.
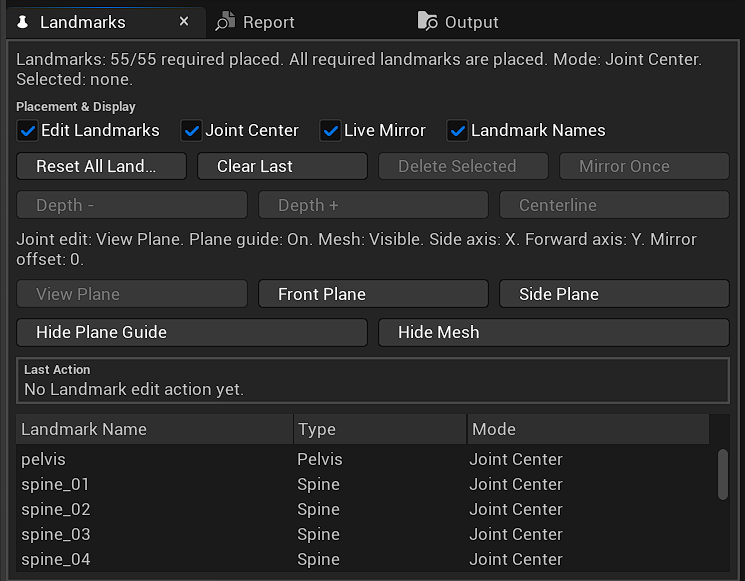
Most buttons here include Tool Tips. Hover the mouse over a button to see what it does. If you are not sure about a button, check its Tool Tip first.
5.1 Edit Landmarks
After enabling Edit Landmarks, you can begin placing Landmarks on the model.
The next Landmark that needs to be placed is highlighted in yellow.
For example, if the current prompt is pelvis, simply click the corresponding pelvis position on the model to place that Landmark, and then continue with the next one.
5.2 Landmark Names
After enabling Landmark Names, the Landmark names are displayed directly in the viewport.
When there are many Landmarks, this helps you quickly confirm whether you are currently adjusting the pelvis, spine, clavicle, elbow, knee, or another location.
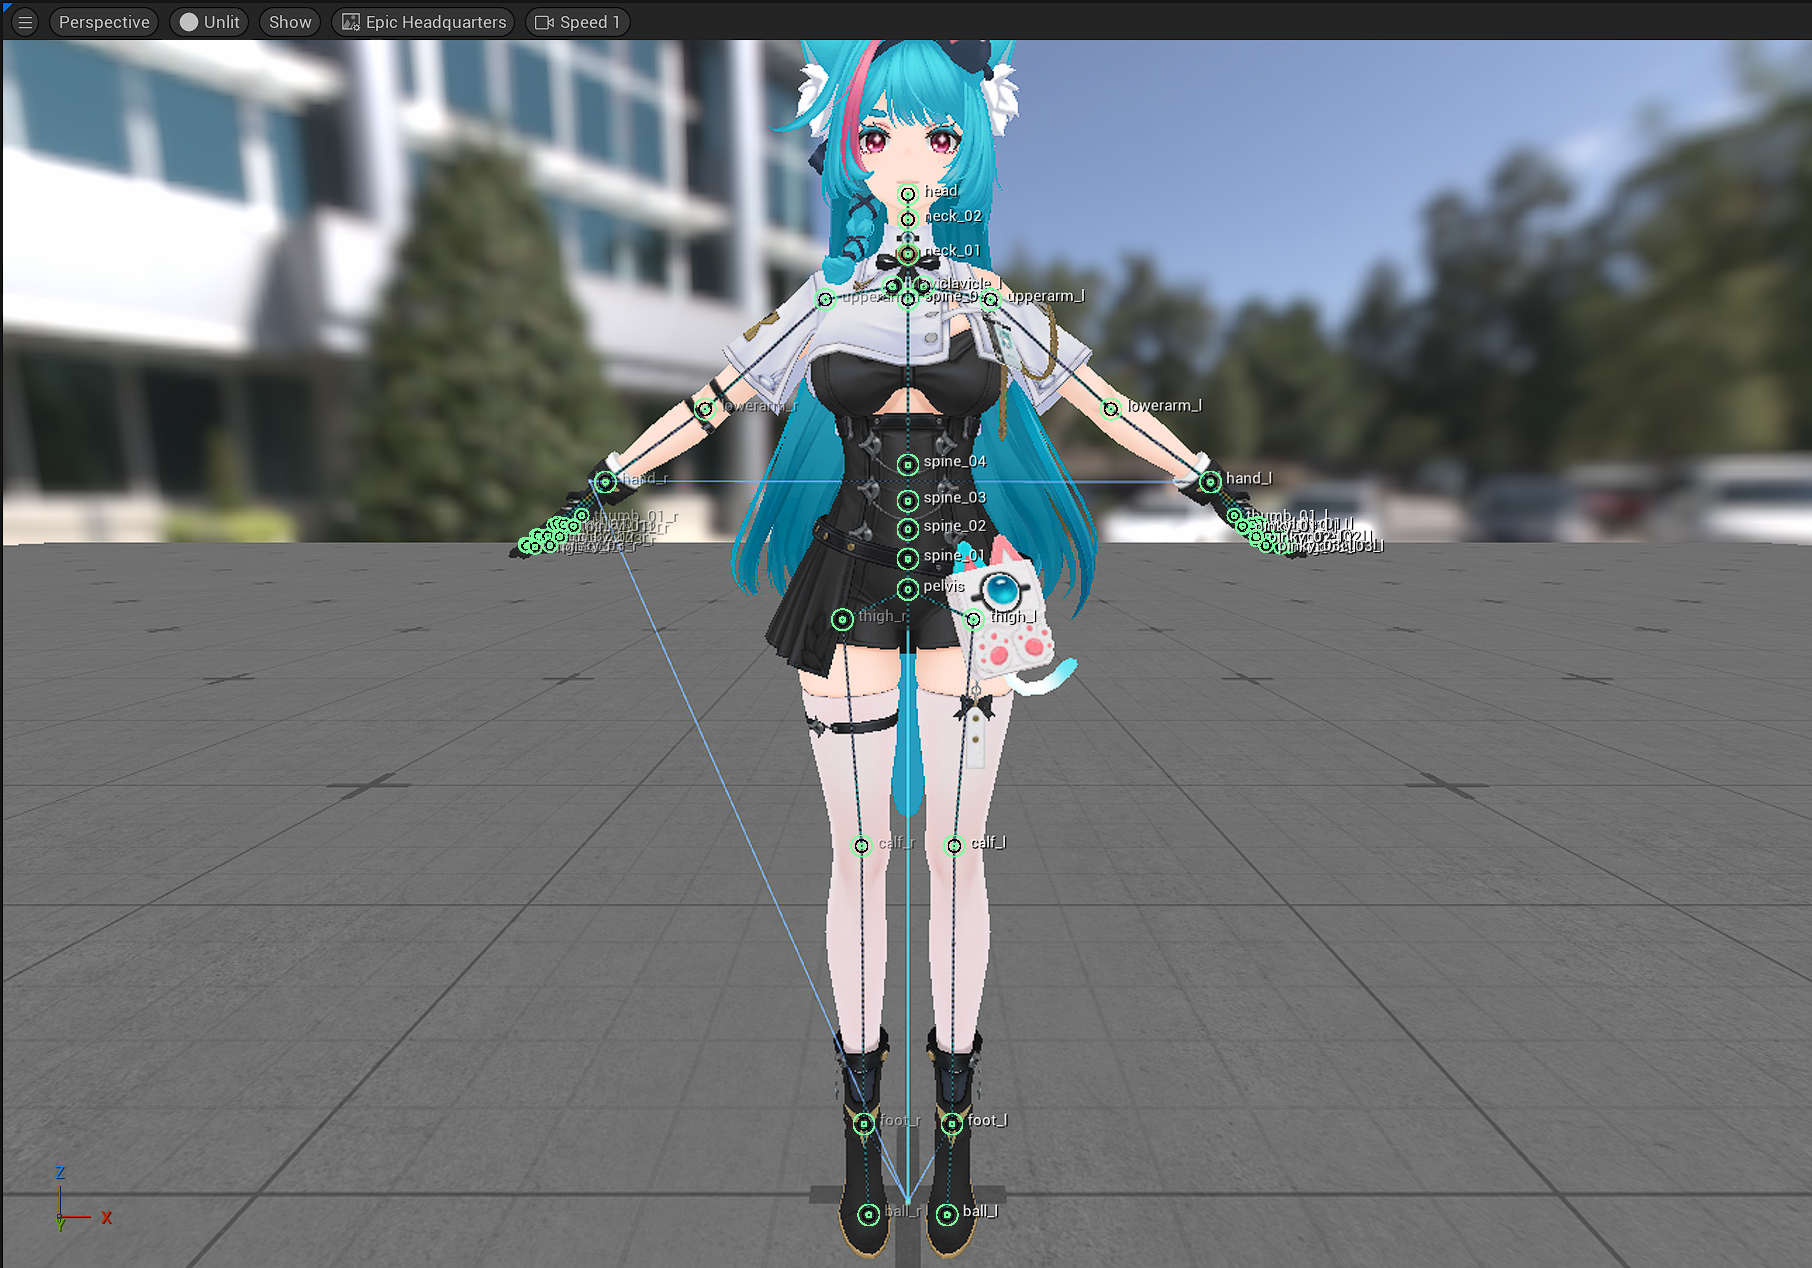
5.3 Landmark Positions Are the Main Bone Positions
A Landmark is not just a reference point.
It participates directly in the final Skeleton fitting, so you can simply think of it as: where the Landmark is placed is where the corresponding major bone joint will ultimately be positioned.
For example:
lowerarmdetermines the elbow joint positioncalfdetermines the knee joint positionhanddetermines the wrist joint positionpelvis,spine, andneckaffect the center-line bones of the body
Therefore, it is not recommended to complete all Landmark placement from only one angle. You can switch between Perspective, Front, and Left views to inspect positions from multiple directions.
5.4 Joint Center
After enabling Joint Center, EasyAutoRig will try to move a Landmark from the model surface you clicked toward the center of the current local volume.
This is especially helpful for joints such as the shoulder, elbow, wrist, hip, knee, and ankle.
For example, when you click the front surface of the knee from the front view, the real knee joint is usually not located on the foremost surface of the model, but inside the volume of the leg. Joint Center helps move the Landmark closer to this internal joint center.
However, models can vary greatly in structure.
A character may wear thick clothing, a skirt, armor, or have unusual body proportions, so the automatically calculated volume center may not always be the most suitable position visually or for animation.
Therefore, Joint Center is better treated as a quick initial result. If a Landmark is not positioned ideally, it still needs to be adjusted manually.
5.5 Joint Editing and Movement Constraint Planes
When you need to move a Landmark manually, you can select a plane in the joint editing settings to constrain its movement.
This prevents the Landmark from moving freely on all three axes at the same time, making its position easier to control.
For example:
- When adjusting left/right and up/down from the front, constrain movement to the front plane
- When adjusting forward/backward depth from the side, switch to the corresponding side plane
Together with the Plane Guide, you can see the current editing plane more clearly.
This is especially useful for adjusting the shoulders, elbows, wrists, hips, knees, and ankles.
5.6 Live Mirror
If the model is approximately symmetrical from left to right, simply enable Live Mirror.
When you adjust a Landmark on one side, the other side will update automatically, which can significantly reduce repetitive work.
5.7 Skeleton Preview
After enabling Skeleton Preview, you can directly see the bone positions generated from the current Landmarks.
It is recommended to focus on:
- Whether pelvis → spine → neck → head follows the center of the body
- Whether clavicle → upperarm → lowerarm → hand passes through the shoulder, elbow, and wrist
- Whether thigh → calf → foot passes through the hip, knee, and ankle
If the bones clearly deviate from the actual joints, continue adjusting the Landmarks.
6. Report Tab
After all Landmarks have been placed and the Skeleton Preview looks generally correct, you can click Validate Rig.
EasyAutoRig will perform a pre-rig check on the current model and display the result in the Report tab.
The purpose of Validate Rig is not to generate the final assets, but to tell you as much as possible before the actual Rig:
- Whether the current model can continue to rig
- Whether a Blocking Error exists
- Whether there are Warnings
- Which automatic skinning route will be used
- Whether there are areas that should be inspected carefully after rigging
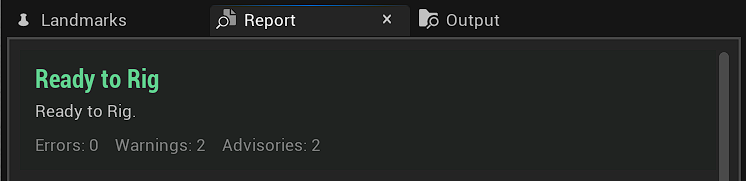
6.1 Ready
If the status is green and shows Ready, no obvious issue that would block rigging has been found.
You can continue by clicking Rig.
6.2 Yellow / Ready, Review Warnings
If the status is yellow and shows something similar to:
Ready to Rig, Review Warnings
this is not a failure.
It means there is still a valid rigging route, but some regions may use a backup method, or advanced semantic skinning may not be suitable for the current model.
For example:
1 | |
This means EasyAutoRig will use the UE Geodesic Voxel compatibility skinning route.
You can still continue to Rig in this case.
After completion, it is recommended to follow the Report and inspect each joint carefully.
6.3 Red / Cannot Rig
If the status is red, EasyAutoRig has detected a problem that blocks the current rigging workflow.
Check the Report and review:
- Model pose
- Orientation
- Landmarks
- Joint Center
- Skeleton Preview
After correcting the issue, run Validate Rig again.
6.4 What Should You Focus on in the Report?
For normal use, focus mainly on:
- Status
- Summary
- Errors
- Warnings
- Recommendations
- AutoSkin Mode
You do not need to understand the names of the internal algorithms.
If you later encounter an internal plugin issue and need to report it, provide the complete Report and LogEasyAutoRig. As a final fallback, you can use Skeleton Only.
7. Output Tab
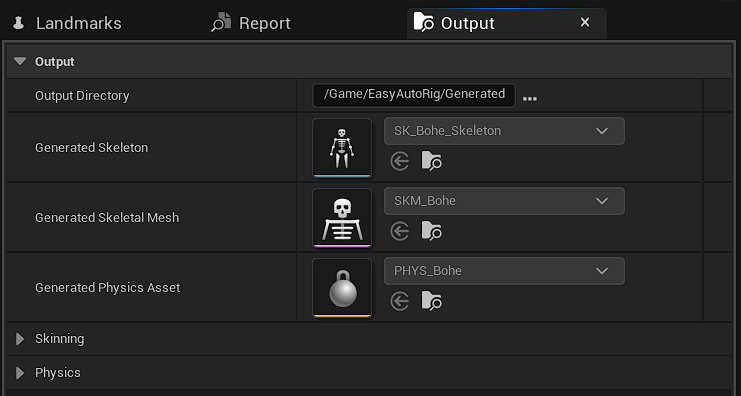
The Output tab is used to manage and view the assets generated by EasyAutoRig.
7.1 Set the Output Directory
You can set the directory where the final assets will be generated. For example: /Game/Characters/MyCharacter/
This allows the Skeleton, Skeletal Mesh, and Physics Asset to be stored together in the character’s own directory.
7.2 View Generated Assets
After Rig completes, you can see the generated assets in the Output tab.
These usually include:
- Skeleton
- Skeletal Mesh
- Physics Asset
If Physics Asset generation is disabled, only the assets required by the current settings will be generated.
The Output tab helps you quickly confirm whether the assets were generated successfully, where they were saved, and exactly what was generated.
8. Rig and Skeleton Only
After adjusting the Landmarks and passing Validate Rig, you can perform the final rigging operation.
8.1 Rig
Click Rig.
EasyAutoRig will begin the complete rigging workflow.
Depending on the current model and settings, it may perform:
- Skeleton generation
- AutoSkin route selection
- Automatic skin weight generation
- Skeletal Mesh generation
- Physics Asset generation
- Final output validation
If the model is suitable for advanced semantic skinning, EasyAutoRig will use SemanticFull.
If SemanticFull is not suitable but UE Geodesic Voxel can handle the model correctly, GeodesicCompatibility will be used.
When the process is complete, you can see the generated result in the Output tab.
8.2 Skeleton Only
If you do not need automatic skin weights, or the current model does not have a suitable automatic skinning route, you can select Skeleton Only.
This feature is mainly used to generate a UE5-style skeleton with EasyAutoRig without depending on the final automatic skinning result.
You can then continue to handle Skin Weights manually in Unreal Engine, Blender, or Maya.
If your goal is simply to obtain a UE5-style Skeleton quickly, or you already plan to paint the weights yourself, Skeleton Only is the more suitable option.
9. Recommended Workflow
For most standard humanoid models, the other parameters in the Details panel can remain at their defaults.
The three things you usually need to focus on are:
Choose a correct Static Mesh that meets the requirements
Place the Landmarks accurately
Use the Report to decide whether to continue with Rig or use Skeleton Only.